How To Paint Gunpla | Gunpla Painting Guide | MUST read
Most kits nowadays look good right out of the box, with no additional painting required, but there will come a time when you will want more from your model.
Painting a Gunpla kit adds a new level of fun and excitement to miniature battle figures, as well as a new look.
In this article, I will answer a few questions and provide some tips for painting your gunpla kit.
The information in this post will help you understand Gunpla paints, the different types, and how to apply them.
Gunpla Painting Guide | the most thorough step-by-step Guide you need:
Before going into depth in this article for each step, I created this list as the only guide on How To Paint Gunplas And Gundam Models:
*Screenshot it and use whenever you paint (or print and stick it to your work desk)
- Prepare The Parts
- Sand the surface: Sand the surface of the Gunpla parts with fine-grit sandpaper to remove any mold lines, rough spots, or any other imperfections. This will help provide a smoother surface for painting and ensure a better final outcome.
- Clean the surface of the Gunpla parts with a mild detergent and water. Use a toothbrush or soft brush to remove any dirt or debris from the crevices. Let the parts dry completely before moving on to the next step.
- Mask the surfaces you don’t want to be painted on the different parts.
- Decide on the painting scheme and gather all the necessary materials.
- Choose a suitable surface to work on, a large worktable with a designated area for spraying is ideal.
- Place the pieces on sticks or holders and secure them in a foam block to prop them up, making sure to attach the parts in a place that won’t be painted.
- Prime The Parts
- Priming the surface will provide a better base for the paint and prevent chipping. Choose a primer that works well with the paint you’ll be using.
- Apply a paint primer, either light gray for light and bright colors or darker for dark colors. This will provide an even tone and ensure the colors are bright.
- Allow the primer to dry completely.
- Start Painting
- Choose the type of paint you prefer to use, acrylic, enamel, or lacquer.
- Thin the paint as needed, acrylic paints tend to be thicker and will require thinning before use If using acrylic paint, you’ll need to thin it with a thinner or water to achieve a smoother and more consistent finish. The recommended ratio is 2 parts paint to 1 part thinner or water.
- Apply the paint using either an airbrush or a brush, depending on your preference and skill level.
- Use multiple thin coats for best results, avoid heavy coats to prevent paint drips and runs.
- Allow each coat to dry completely before applying the next.
- Panel Lining
- Using a panel lining pen, a gundam marker, or paint, carefully outline the panel lines on the model to give it a more defined look.
- Practice on a scrap piece before starting on the model.
- Gloss Top Coat
- Apply a gloss top coat to protect the paint and give it a smooth surface for panel lining and decals. If only matte top coat is available, it can be used.
- Allow the top coat to dry completely.
- Decals
Apply the decals as desired. Use a decal setting solution to help position the decals and soften them to conform to curves and contours.- Final Top Coat Your Gunpla
- Apply a final matte top coat to protect the panel lining and decals, and give the Gunpla a more realistic look.
- Avoid applying too thick coats as this can affect the look of the decals.
- Final touch-ups: Check for any missed spots and touch up if necessary.
- Final Steps
- Final coat: Apply the final coat of varnish to ensure the durability of the paint.
- Allow the model to dry completely, usually overnight. Handle with care, avoid touching the painted surfaces.
TopTips When Painting Gundam Models:
LeisureGuided.com
- Practice painting on scrap pieces before starting on the model.
- Experiment with different painting techniques, airbrushing, and brushwork to find what works best for you.
- Avoid over-thinning the paint, it can result in uneven coats and runs.
- Keep a clean and well-lit workspace, avoid dust, and debris.
- Work patiently and carefully, painting a Gunpla model takes time and effort, but the results are well worth it.
What Type Of Paint Should I Use On Gunpla?
Painting Gunpla kits can be difficult, especially when the model is small and has tiny and complicated pieces. However, for me, it is just as much fun as putting together the kits themselves.
There are various paint types for Gunpla kits, some of which are more commonly used than others.
The three most commonly used paint types for painting Gunpla pieces are acrylic, enamel, and lacquer.
· Acrylic Paint For Gunpla
Acrylic paints are color pigment solutions that are alcohol or water-based and are made from acrylic resin and polymer solution.
Acrylic paint is considered the best option for gunpla models for several reasons:
- Versatility,
- Ease of use,
- Durability,
- Safe to use,
- Cost-effective.
Acrylic paints are a popular choice among gunpla builders and painters due to their versatility and ease of use.
These water- or alcohol-based pigments are made from a combination of acrylic resin and polymer solution. One of the key advantages of using acrylic paints for gunpla is their fast drying time and water-resistance once dry. These properties make them a great choice for builders and painters who are looking to work quickly and efficiently.
When using acrylic paints for gunpla models, it’s important to note that they are thicker than traditional paints and will require thinning before use. A thinned paint will provide a smoother and more consistent finish on your model.
However, it’s important to keep in mind that acrylic paints can chip easily if not properly primed and varnished.
Acrylic paints are also easy to apply by airbrush spraying or brushing, making them a versatile choice for different painting techniques.
They are long-lasting, easy to clean and easy to use, making them the ideal paint for gunpla models.
· Enamel\ Oil Paint For Gunpla Model
Enamel paints are oil-based paints that contain color pigments as well as drying oil. The oil, typically Linseed oil, serves as both a solvent for dissolving the color pigment and a binder for hardening the paint after it has been applied.
Before acrylic, this was the most commonly used type of paint. Enamel dries the slowest, making it ideal for painting with a brush.
Oil paint for Gunpla shouldn’t be too thin or too thick.
If it is too thin, then the paint will run off.
If it is too thick, it will be difficult for you to paint your gunpla and your work will be uneven.
It takes some trial and error to figure out what is the best viscosity for you and for your models.
· Lacquer Paint
Lacquer paints are typically alcohol-based paints made from lac derived from tree sap and color pigments.
They dry faster than the other two types are more durable and perform best when airbrushed.
They are, however, the least used paints on Gunpla models due to their difficulty of use. Lacquer paints do not allow for mistakes, they dry quickly, and once dry, they are difficult to remove without damaging the plastic.
Which Type Of Paint Should You Choose For Gundam Models
The best type you should use to paint a Gunpla kit depends on several factors, including the type of kit you want to paint, the material the kit is made of, and the painting material you want to use.
- It is best to use Lacquer or Acrylic paint if you intend to use an airbrush.
- If you have a paintbrush, Enamel is the best choice.
- Enamel paints are a good choice if you want something that will last a long time.
- If you’re going to paint your Gunpla kit with lacquer paints, use caution because lacquer thinner eats into ABC plastic and can harden it, causing it to break.
Will Any Acrylic Paint Work On Gunpla?
Yes, acrylic works well on Gunpla.
Acrylic paint is generally popular, especially because it can be used to paint any surface with ease. This includes plastics and metals.
On the other hand, random acrylic paint will not give you the best result for your Gundam model.
IMO Tamiya Acrylic is the best type to use. This acrylic will not eat into plastic and will not harm your Gunpla kit.
However, Tamiya acrylic paint does not last as long as enamel or lacquer paints and is easily chipped away.
If you expect your Gunpla model to be used frequently, you should avoid using acrylic paints. Otherwise, it is perfectly safe to use.
Can I Use Oil Paint On Gunpla?
Yes, oil paints can be used on Gunpla.
Oil paints are best used to give Gunpla models a weathered or rugged appearance. Although oil paints are not as widely used as acrylic, enamel, and lacquer paints, they are still perfectly safe.
Because they are thick, they dry slowly. If you decide to use oil paint on your Gunpla kit, mix it with mineral spirits to make it lighter. Mineral spirits serve as a thinner for oil paints, allowing them to dry faster.
Oil paints are best applied by hand brush; they should never be sprayed or airbrushed.
Get it NOW
How I Prepare My Gundams For Paint
Before I begin painting a Gunpla kit, I make some preparations, regardless of the type of paint or painting technique I intend to use.
- First, use the instruction manual to snap-fit the model.
- Take note of the parts that require modification and painting, as well as other workings, as you build.
- Following that, disassemble the model and complete any necessary work like carving out seam lines, making modifications, adding detailing parts, and so on.
- The model must then be carefully sanded to ensure that the paint adheres better to the plastic and to remove clip marks and bumps.
- Finally, use a primer or surfacer to coat the parts. These ensure that the material, regardless of its initial color, is ready to be painted with any color. A primer or surfacer can be white, black, or gray. It is best to use the one that is most appropriate for the paint you intend to use.
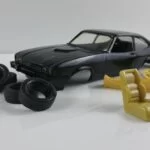
Organize Gunpla Parts For Painting By Groups
Painting Gunpla models can be challenging, especially when there are many small parts to contend with.
Parts may go missing if they are not carefully organized, and the wrong color may be applied to them.
To properly organize your Gunpla parts, consult the kit’s instruction manual for a prototype of how the model should look, and cut out the parts as if you were only building the figure without painting. The manual will show you where each part is supposed to go and which parts share the same color.
Although the big parts are usually fairly easy to distinguish from one another, the smaller, intricate parts may confuse you, but the manual will be there to help you.
Leave out any parts that do not require painting, such as Polycarp.
Separate the Gunpla parts into groups, with the parts that will be painted the same color together, and then apply the paints accordingly.
Get it NOW
Tips For Painting A Gunpla With A Brush
Painting a Gunpla with a brush is a simple process. There are some things you must have in place before beginning a hand-painting project, just as you would before airbrushing or spray painting.
- First, ensure that the parts you intend to paint have been properly sanded and primed and that they are well organized.
- Next, you should have the appropriate brush. There are three types of brushes used to paint Gunpla kits: plain brush, plain tiny brush, and circular brush, each with its own set of features and applications.
- Then, get the paint ready. You’ll most likely be using acrylic or enamel paints; Whatever paint you use, you’ll need to thin it with the appropriate solvent. Acrylic is water-soluble, whereas enamel requires a thinning agent.
You can now begin painting.
When painting, apply thin coats one after the other until you achieve the desired consistency. Brush on each layer, being careful to apply just the right amount of paint to avoid paint beads forming at the tips of your figures.
Allow each layer to dry completely before applying the next to avoid brushing away the previous layer.
Apply a protective coat between color coats or before doing any detailing with different colors or shades of paint. The protective coat keeps the paints from mixing and reacting, which is especially important when the paints are of different types.
A Guide For Airbrushing A Gunpla
There are three ways to paint a Gunpla kit, with airbrushing being the most difficult due to the precision required.
Airbrushing a Gunpla can be time-consuming, but it is much faster than brush painting, and the time and effort you put in will eventually pay off with the best paint jobs you will find on a Gunpla model.
LeisureGuided.com
To airbrush a Gunpla, you’ll need the airbrush itself, a compressor, and, depending on the type of compressor and airbrush you buy, an additional hose to connect them. You should also make sure it is done in a well-ventilated place and that you wear a respirator when using it, as it releases toxic fumes that should not be inhaled.
Prepare your Gundam model parts for painting as described above, and sort them by color.
After that, attach the pieces to skewers or alligator clips in a way that does not interfere with the part you want to paint.
Make sure to prime the parts first, as this helps to set them up nicely before airbrushing.
Thinning your paint is important because it ensures a smooth coat. Apply the thinner according to the manufacturer’s instructions, but as a general rule, start with a ratio of 75% paint and 25% thinner and build from there until you achieve the desired consistency.
Set up your airbrushing gear. Connect the compressor to the power supply and the gun to the compressor. Fill the gun’s paint cup with thinned paint and begin painting.
When airbrushing your Gunpla model try to keep even distance for each layer so you’ll get an even coat.
The best way to airbrush Gunpla parts is to move from one side to the other and start spraying the paint before it meets the part and after you passed the part. That way you ensure that the borders of the part have an even coat.
Get it NOW
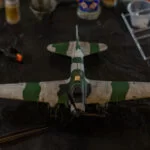
Weather Your Gunpla Model
Weathering a Gunpla model gives it a realistic appearance and makes it appear to have been through some battles. After all, they are doppelgangers of real-life Gundam series characters.
There are numerous weathering techniques, and the best one for you will be determined by what works best for you.
However, the most common technique is dry painting. This is the simplest technique, and it entails painting the kit with a dry brush.
To use this technique, dab your brush in paint and wipe it away until only a small amount of paint remains.
Then, using the dry brush, apply the paint to the desired area. This gives the kit a worn-out appearance as if it were found on the battlefield.
Weathering sets (Gundam or Tamiya), paint chipping, and decal distressing are some other techniques.
How And When To Fix Gunpla Paint?
If your Gunpla paint is damaged or scratched, you should repair it.
Sometimes a scratch on your Gundam model is so severe that it dents the plastic and disfigures the model. Of course, you can see it as “spoils of war,” but let’s face it, it’s not a pretty sight, and when this happens, it’s best to fix it.
The extent of the damage determines how to repair a damaged Gunpla paint.
The general solution is to sand that area first (disassemble it if you need).
This will level the surface and prepare it for repainting or other types of repair. Before applying your paint, apply primer and allow it to cure. After that, repaint it.
Read more to give your Gunpla a better look:
Everything About Gundam Markers (FAQ)
LeisureGuided.com
Are Gundam Markers Worth It
8 Gundam marker alternatives
How To Dry Your Gunpla Paint?
Gunpla paints generally dry quickly. Most paints would be dry enough to apply another coat in an hour.
Most types of paint start to dry out immediately after application. However, it takes about 2-4 hours to show a dry surface. Even after this time, the model is not fully set for handling.
Setting takes about 24 hours or less depending on the type of paint you use. Preferably, you should leave your kit standing for a day or two, unless you choose to apply an overcoat.
A light wind from a fan or air conditioning system can help, but it is not necessary. In my opinion, allowing your Gunpla to dry by itself at normal room temperature is the best choice.
However, it never hurts to be sure, so if you want to manually dry your kits while painting, attach each part to a skewer, toothpick, or alligator clip, wrap them in foil and place them in the sun to dry. It should be completed in no time.
Curing Your Gunpla
Paint curing differs from paint drying. When the paint has completed its chemical bonding process and is completely bonded to the plastic, it is said to be cured.
Cure time varies depending on the type of paint used. Acrylic usually takes a week to cure, whereas enamel only takes a day or two. Lacquer, on the other hand, cures quickly, within a day.
Allowing the paint to cure is important to keep the paint on your Gunpla for a long time without any scratches.
Top Tip: Test Before You Paint For Colorshift
Color shift is a change in the color of ink caused by a variety of factors such as ink density differences, white balance or transfer, or, in the case of some paints, exposure to air.
If you are not familiar with the color or type of paint you are using, it’s a good idea to keep a color palette or an extra piece of paper on hand to test the color before applying it to your Gunpla model.
Conclusion
I hope that after reading this post, you will be able to make a more accurate and informed decision about the Gunpla paints that will best suit your needs.
Painting a gunpla model is not hard, as long as you are doing it right and as long as you follow the steps listed above.
Preparing your gundam parts for painting, as well as organaizing them to paint is, in my eyes, the most important part in painting your gunpla.