How to Paint Metals on Miniatures
When painting metals on miniatures, miniature painters use non-metallic metals (NMM) or true metallic metals (TMM).
Non-metallic metals are typically imaginary metal paints but which like metal paints. True metallic metals, in contrast, are paints that contain metal (mica) pigment. However, they both help you create a metallic surface on miniatures.
These two metal paints offer varying aesthetics to miniatures. However, in this article, we discuss everything you need to know about painting True Metallic metals.
Painting Metals on Miniatures
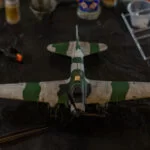
Painting realistic metal on miniatures takes a lot of work and understanding, especially as you have to consider how the metal reacts to light. This reason alone makes it all too easy for miniature painters to fall into the trap of neglecting the metal areas on their miniature models.
When painting metals on miniatures, the first thing to consider is the direction from which the light will come from. It helps you paint in the light and shadows accordingly.
The key to painting good metal paint on your miniature model is to focus on creating a very strong contrast between the dark recesses on the model that receive little to no light versus the bright parts (the raised areas) where light frequently bounces on.
When you use metal paints to paint shadows and highlights on the miniature’s surface, you indirectly stimulate the effect of light hitting the surface from a certain direction so that it looks like how light reflects on metals in real life.
Besides this, always pay attention to how you apply highlights when painting metals on miniatures.
With non-metallic metals, highlights are often painted so that they appear really light, almost to the point of being pure white for maximum contrast between light and shadows and to effectively stimulate metal shine on the miniature’s surface.
True metallics won’t look good on white highlight. Instead, apply the brightest metallic color in your range and use it to achieve similar contrast.
Using metal paints
With the metal paints, the biggest advantage is that you won’t only be able to create contrast between ‘dark’ and ‘light’ on the mini but also make it look shiny or appear flat (dull).
While this factor stands as the major strength of metal paints, this is one step most mini painters often neglect, which makes getting the right contrast between details almost impossible.
So, what does this mean?
Simply put, when painting metal paints, you need to grasp control of the metal pigments in the paint so you can easily create a shiny effect only on the highlights and restrict some parts of the model to having a dull or flat appearance so you can attain shadow effects that contrast with the shiny highlight. But, there’s a catch!
To achieve this controlled bright and dull contrast with metal paints, using a normal paint to glaze the basecoat is essential. Most people use washes to achieve this, but the problem with washes is that they are inherently translucent. No matter how many layers you apply washes, they won’t give you a well-covered undercoat to create the stark contrast you want.
By glazing with regular paint, you can gradually build up the colors in layers and achieve an opaque finish perfect to replicate dark shadows on surfaces. Then, once you add shading and highlights, you can quickly build up shine in areas you want them on.
Technique for Painting Metals on Miniatures
Note: when choosing metal colors for your miniatures, consider a color scheme that matches your mini as there really is no rule on what color to use.
- Step 1: Prepare the mini
Metal miniatures straight out of the box have lots of flashes, mold lines, and oil that make them appear unrealistic when painted. Before anything, use your hobby knife, file, and sandpaper to smoothen any rough area on the miniature’s surface. Then, wash the mini with a toothbrush and liquid soap to remove possible grease on the mini.
- Step 2: Basecoat the Model
After priming with Tamiya’s surface primer to get a mid-grey undercoat, apply two to three thin coats of Citadel’s Leadbelcher as the base coat. Thin this paint with water before use.
- Step 3: Shade
If you want your model to stand out, use uncommon colors for this step. I typically apply 3 coats of light purple color like Citadel’s ice blue and a mix of Formula P3 Sanguine highlight.
Make sure the paint is diluted so that only a hint of color appears when you use them on the model, no matter the number of coats. It helps you build up opacity as slowly as possible. Also, wipe off any excesses on the paintbrush before using them on the model to avoid paint pooling – much like dry brushing.
Next, apply a mixture of the P3 sanguine highlight with Citadel’s Doombull Brown colors, following the technique above. With the P3 Sanguine highlight, mix Vallejo’s model color hull red and apply over the previous coat.
After this, mix the VMC hull red with P3 bloodstone and little black color apply it over the undercoat, and touch it up with P3 Bloodstone mixed with black paint. Once it dries, mix P£ bloodstone, Citadel’s Snakebite leather, and black, apply over the previous coat and do a final shading with the Snakebite Leather paint and black color.
- Step 4: Add Highlights for Shine
After shading your metal miniature, it’s time to add a highlight to create contrast. Before adding highlights, ensure you know where you want to paint light reflection and where you want the shadows to be.
Now, apply paint to bring back the metal shine to the model. Usually, shading a surface makes them appear dull and lifeless, especially as the shade colors cover up the metal part of the model from being visible. I typically use GW’s Leadbelcher to do this trick. Then, I glaze this paint thinly.
Next, I mix GW’s Runefang Steel and their Leadbelcher, water it down and gradually move from dark to light, building up the highlights on the model. Once you’re done, mix a color close to Citadel’s Runefang Steel with some water and concentrate on creating those light reflective surfaces wherever you want them on your model.
- Step 5: Highlight the Dark Shadows
After creating highlights for a reflective effect, reapply the GW’s Doombull Brown color over the darker areas to ensure the contrast looks right.
- Step 6: Add the Final Highlight on the Reflective Parts
On the final highlight, apply the Runefang Steel again and Vallejo’s Model Color Metal medium to create small light points on the metal.
Conclusion
The interesting part of painting metals on miniatures is that when you get the technique right, it looks like the real thing.
However, as we mentioned earlier, painting metals can be a whole load of work, especially when picking out the light reflection.
The fun part of this painting technique is that no matter how frustrating it can be to get your details right, constant practice and patience will help you attain satisfactory results most painters can’t even replicate.