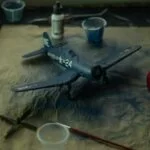
Airbrush troubleshooting guide (22 airbrush issues solved)
Airbrushing is one of the easiest ways to get a smooth finish on your miniatures and scale models. However, like any mechanical device, an airbrush can quickly face mishaps that may affect its function.
If you’ve run into a problem using your airbrush, we’ve designed this guide just for you. From clogged nozzles to overspray, air pressure, and trigger issues, this airbrush troubleshooting guide will offer solutions to your most challenging airbrush problems.
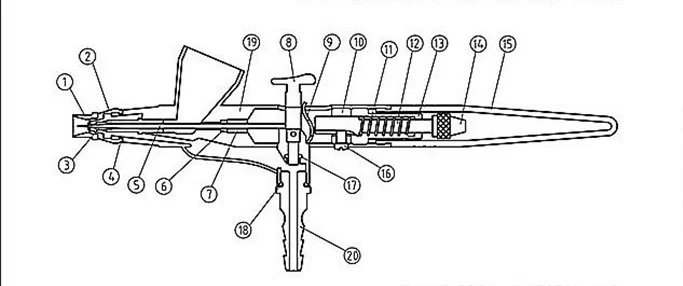
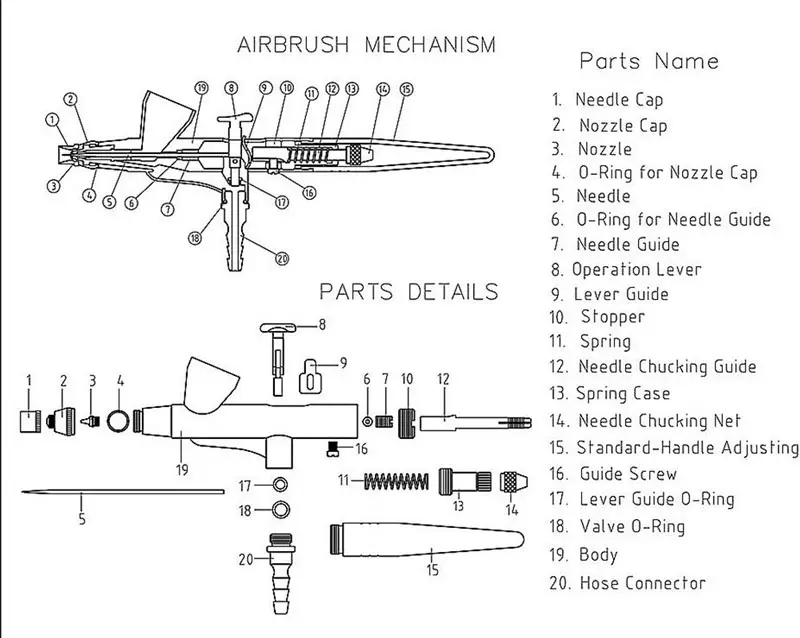
First, learn how to take your airbrush apart:
- Remove the cap that covers the needle.
- Remove the cap that covers the nozzle.
- Use a wrench to loosen and take out the nozzle.
- Unscrew the handle from the rest of the device.
- Remove the nut that holds the needle in place.
- Carefully extract the needle by pulling it towards the back, being mindful that it may need a slight twist to come out.
- Unscrew the guide that holds the spring in place, noting that this process may take some time due to the threading.
- Take out the spring.
- Pull out the guide that holds the needle in place.
- Remove the auxiliary lever by twisting it 90 degrees and pulling it straight out.
Airbrush doesn’t spray paint
When your airbrush won’t spray paint, the fault may stream from several problems. They include:
- A blocked nozzle – soak the nozzle for some minutes and wash
- Bent needle tip – change the needle
- Loosed needle locking unit – tighten it
- Thick paint – Thin it to milk consistency
- Low air pressure – increase the airflow
Airbrush is not blowing air
There are multiple reasons an airbrush won’t blow air. They include:
- Lose needle chunk – tighten it
- Dirt or old paint inside the needle – disassemble the airbrush and wash
- Wrong size needle on nozzle – Use the right size
The airbrush trigger is not working
The possible cause of this problem is a damaged O-ring in the air valve. So, you have to replace it. Strip down the air valve, remove the damaged O-ring and replace it with a new one.
Airbrush is not spraying consistently
Does your airbrush refuse to spray consistently? You may have:
- Dries paint on the needle tip – clean with your cleaning solution
- Thick paint – thin it to milk consistency
- Dirt in the airbrush – deep clean the airbrush
- Damaged nozzle – replace it
Airbrush only sprays when releasing the trigger
This happens when the needle isn’t positioned properly in the nozzle. A quick solution is to:
- Unscrew the needle-locking nut. Then, reset the needle so that it sits well. Don’t forget to tighten the nut.
The siphon feed airbrush is not working
If this happens, it means the little air vent holes on the siphon bottle are dirty, or yours don’t have these tiny vent holes. On the other hand, leaking needle bearings can cause your siphon feed airbrush to stop working.
Get a siphon bottle with vent holes, always make sure they are clean, and keep the needle bearings tight.
Airbrush keeps blowing air
It could be caused by
- A loose air valve – tighten it
- Sticky or swollen air valve seals – disassemble the air valve components, lubricate the seals and reassemble.
- Eroded air valve seals – Replace them
Bubbling in the gravity cup or suction bottle
It means you have air pressure in the paint reservoir. The common causes and solutions are:
- Loose are cap – Tighten it
- Blocked nozzle – Clean it
- Eroded nozzle seals – Replace it
- Split nozzles – needs replacement
Airbrush blowing air but not paint
It means you won’t get paint on your model. When this happens, it may be because:
- The paint is too thick – thin it or increase the air pressure
- Loose needle chuck – tighten it
- Stuck needle from dried paint – clean it
- No vent hole on the siphon bottle – make sure it has one to prevent a vacuum that prevents the paint from flowing
- Leaking needle seal – adjust the chickling nut or replace it
Why is my airbrush spattering?
It will make your work look ugly. When you have a splattering airbrush, check for:
- Thick paint – thin to milk consistency
- Low air pressure – increase it
- Dried paint on the needle – loosen the needle and clean it with a cotton swab or soft cloth dampened with an airbrush cleaner
- Dirt in the needle cap or nozzle – clean it and replace it if necessary
Why is my airbrush spitting?
This can be caused by two factors:
- Overly thinned paint – add more paint into the mix or reduce the air pressure
- The paint is applied heavily on a non-porous surface – airbrush at a good distance
Airbrush clogged
Clogs occur when the paint dries too thick or from former paint pigments in the tip of the needle.
A quick solution is to thin paint before use or clean the needle to remove dirt.
Why is my airbrush needle not moving?
If your airbrush needle fails to move, it is because of three things:
- Loose needle chuck -tighten it
- Dried paint on the needle – disassemble the airbrush and clean with your airbrush cleaner
- Wrong size needle – make sure the needle is the right size for the nozzle
The airbrush is not spraying smooth
When the airbrush does not spray smoothly, it is because it is
- Too far away from the model – spray from the right distance to avoid this
- The paint does not mix well with the thinner – Blend paint and thinner well before use
- You applied paint too heavily – spray in thin coats
Airbrush is not pulling the paint
This can be caused by several reasons:
- Low air pressure – Increase airflow
- Partially broken nozzle – Change the nozzle
- Thick paint – Thin it to milk consistency
Air pressure too low
When your air pressure is too low, increase the air pressure on your airbrush compressor. Also, use the right PSI setting to increase air pressure.
The spray will not shut off
When the airbrush refuses to stop its spray application, here’s what you should do:
- It could be from a damaged nozzle – Replace it
- Clogged nozzle – Remove and clean it
- Dirty needle – Remove and clean it
- Stuck needle – Lubricate it
- Needle not positioned well in the nozzle – position the needle properly in the nozzle and tighten the needle chucking nut
- Stuck trigger – lubricate the trigger and air valve packing units
Off-center spray
It is caused by a bent needle tip.
Straighten it with a flat sharpening stone or replace it.
Grainy spray
Grainy paints make your model look old. Check for problems like:
- Low air pressure – increase it
- Dried paint on the needle tip or dirt in the nozzle – remove and clean
- Thick paint consistency – Thin it
- Too far from the model – paint with distance in mind
Airbrush Works for a while, then doesn’t
Two of the biggest causes of this problem are:
- Tip dry or Dried paint on the needle – remove and clean with a cloth dampened with airbrush cleaner
- Lumps in the paint – shake or stir the paint well before use
Paint too thick
If the paint is too thick and can’t spray well, consider thinning it to milk consistency or up your PSI setting if you don’t want to thin the paint.
Common mistakes when using an airbrush
- Not cleaning the airbrush after each application
- Applying too much paint
- Holding the airbrush incorrectly when airbrushing
- Moving the airbrush too quickly when applying paint
- Putting too much paint in the cup
- Pulling the trigger all the way back while applying your airbrush foundation
- Not keeping the airbrush in constant motion (holding it still) will cause blotchiness
Conclusion
Your airbrush is a machine and will always have small problems no matter how well you use it. So, carefully study its parts breakdown to understand how it works before using it. This way, you can quickly discover the fault before it gets too late and damages your work.