Creating Realistic Weathering on Miniature Terrain and Vehicles
Painting miniatures involves giving your model that smooth and sleek natural appearance that makes them look like the real deal. But, while some models look smooth and clean, others benefit from the rusty chipped, and aged look. That’s where weathering miniatures come in.
If you are considering painting your terrain or vehicles, making a realistic weathered effect is key to transforming your models. In this guide, you will learn everything you need to know about painting realistic weathered looks on your miniature models.
Introduction to Weathering
Weathering in miniature painting is the art of making miniature models look eroded, coarse, or worn.
In reality, vehicles and terrain accumulate mud, dust, and oil stains become worn, and can get scratched depending on how people use them. Weathering tries to replicate these realistic effects on miniature models.
When creating weathered textures on your miniature terrains and vehicles, the type of weathered appearance you use on them will depend on the age of the model, the terrain, their level of maintenance, and their current state when placed in a certain environment.
For example, when placed in a moisture-friendly terrain, water will run down terrains, making them look rusty. Meanwhile, tanks generally require minimal maintenance, unlike aircraft. Hence, when painting tanks, you need to give them a more weathered look since they risk higher degrees of wear and tear. There’s more!
The secret to creating realistic weathering on miniature terrains and vehicles is to paint them in gradients.
What we mean is to make multiple layers on different parts of the model to make it appear more natural. Hence, how you layer the paint will determine how authentic and realistic the result is.
A pretty effective weathering will involve layering different textures on top of each other, so the undertones cover well, and the top coats look good without precision errors. When weathering my miniatures, I typically do three to four layers that add texture, compliments each other, and create visual interest.
Also, when creating weathered textures on miniatures, focus on recess shading or adding more mud splatters to the bottom of the vehicle or terrain and any other trick that makes your model appear truly run down. A step like this will help you create fade to add depth to the model and variations of chips and dirties that make your model look more interesting.
General Technique for Weathering Terrain
Most mini painters prefer that their models have a pristine appearance, but you should ensure that important components like the terrain fit appropriately with your subject. So, if your vehicle shows signs of wear and tear, the chances of your terrain looking worn will be pretty high.
To stimulate the effect of a rustic terrain, do the following:
- Prime, basecoat, and do some basic highlights
- Apply a thin wash of black on the base
- Then, using your stiff bristle drybrush, apply dark earthy color, preferably any color that matches Citadel’s Doombull brown or Rhinox Hide, all over the terrain.
- Also, drybrush the raised edges that hold pieces like rocks but use lighter brown shades like Citadel’s Zamesi Desert and Balor Brown.
- Don’t stipple the paint, as it won’t work well on rough terrains.
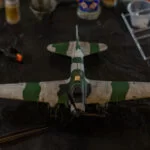
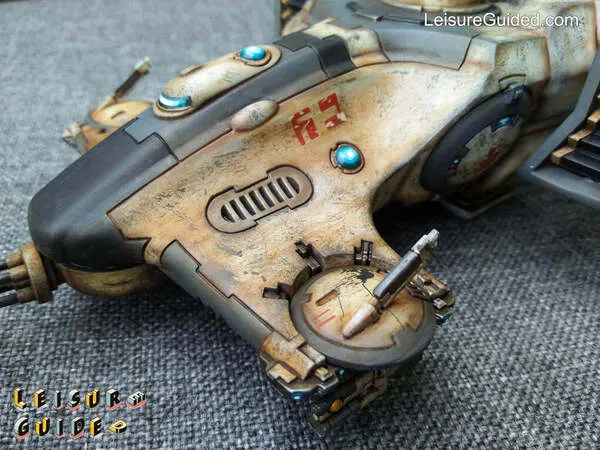
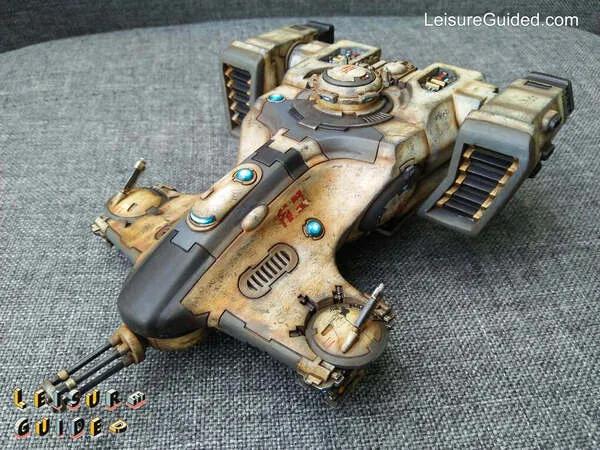
Techniques for Weathering Vehicles
When weathering miniature vehicles, understand that you need to vary your intensity. The vehicle’s hatches, drive wheels, ribs, and ridges should have different levels of wear. Also, try to indicate chipped parts of the vehicle to accentuate the weathered look of your vehicle.
If you’re working on a military vehicle like the T-55 Russian Tank, here are a few steps o help you create an authentic weathered finish.
- Basecoat the miniature
It gives your weathered effect a solid base to help you build texture and create real results. Do at least three coats before moving to the next step.
- Apply Wash
After base coating the model, apply a thin black wash to create realistic contrast on the vehicle.
- Drybrush over the wash
Then, using a brown color slightly lighter than the basecoat color, drybrush the entirety of the vehicle.
Next, water down a color similar to Citadel’s Mournfang brown to add rust to areas like the rivet, hatches, and ridges. Also, try to create some rust streaks here if possible. We’ll get to this shortly.
When weathering miniature vehicles, understand that heat also rusts metals. So, paint rust on the exhaust using Mournfang brown but make sure to mix it with a small amount of yellow paint for an orange shade.
- Drybrush the lower parts of the vehicles for mud effect
Next, use a 50/50 mixture of Doombull brown and Rhinox hide for the bottom of the tank to give it a dark earthy shade.
Make sure to apply this paint heavily on areas around the rear part of the vehicle. Then drybrush lighter shades like the Balor Brown and Zamesi Desert over the previous coat.
- Create bare metal patches (optional)
To do this, apply Citadel’s Leadbelcher over areas such as the hatches, bulldozer blades, and engine panels that may wear off and expose the metal. Then, using rust wash color again, paint over the bare patches to enhance the worn metal effect.

Advanced Techniques for Weathering
- Create Splash Streaks with Turpentine
Technically, people won’t consider this step when painting weathered effects, especially on acrylic paints. However, the advantage of this step is that it helps you create streak marks that look natural. Just make sure to add them only on the side of the model.
Before it dries, take some small amount of rust color and brush it along the streak. Avoid dragging the brush over the wet surface as it leaves brush marks. Then, let it dry for 2 to 3 days and move on to applying the wash.
- Chipping
An easy and fast way to create that chipped paint effect on miniature vehicles and terrains is to do sponge chipping.
- Find a sponge (not literarily. It could be a foam) and ball it up so that it appears puffy.
- Jab it on paint. Then, wipe the excesses on a clean paper towel until the excess paint comes off.
- Consider the spots you want to chip on the vehicle and jab it to get instant chips.
- Focus more on the edges and corners of the vehicle when doing this, as these places see more abuse than the main body.
Conclusion
Weathering effects done right can make your model really stand out. Plus, an advantage of painting this effect is no matter how it turns out, it won’t look so bad that you don’t love the results.
Then again, a little trick to keep in mind when weathering vehicles and terrains is to focus more on the edge part of the model. When you focus on places that would take bullets, or debris the most heavily, you can give your models a quick, dusty, and dirty look in no time.
Besides this, make sure to start slow and don’t overdo it. With weathering, you can always add more paint when needed.
Source
https://www.contractorlighting.com/documents/MRR_weathering.pdf
https://www.dakkadakka.com/wiki/en/Dakka_Modeling_FAQ:_Weathering