How to Paint Glowing Energy Effects on Miniature Weapons
How do you paint glowing guns, lightning swords, and eerie green glow effects on your Warhammer 40K Eldar blades?
It’s all in the technique.
Our miniature painting guide today will teach you how to add mystical glow dimensions to every miniature power weapon in your collection.
The Basics of Painting Glowing Energy Effects
Glow energy effects, or Object Source Lighting as it is commonly known, is a miniature painting technique that helps you create magical glowing light on miniature weapons. Done rightly, the paint actually feels like your weapons are actually glowing.
The best part of painting glow energy effects is that you can do it with pretty much any color using a paintbrush or an airbrush.
Regardless, painting the glow energy effect on miniature weapons won’t feel impossible without planning the light source and achieving pro-level blends. What does this mean?
How the lighting is cast from the weapon to the objects around it and how well you mix the colors will impact the results you get.
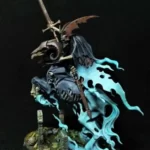
for the glowing effect, the light cast from the object outwards
When painting weapons, the glowing energy emanating from the gun, sword, or blade will cast light on the raised areas of your model. Once you determine the light source, you’re halfway to getting the glowing energy right. The trick to painting glow energy so that it looks like it glows is to paint the light “outward.” Painting inwards will make the areas surrounding the weapon appear shadowy.
You also need to learn how to blend the glowing light from the weapon. If you’ve ever seen something glow in real life, you know how they reflect on other elements around them, so they lose 60% of their original color. This often happens when you have colored light on the weapon.
Once the glow energy tints some of the elements around them, it means you also have to get this light right wherever they appear. This is where an airbrush makes the task easier for you. Airbrushing helps you achieve smooth fade and gradients of lights on the miniature frame. Still, that doesn’t mean you can’t do it by hand.
Note: here, we will walk you through this blending process with a quick and easy step-by-step hand-brushing technique.
Techniques for Painting Glowing Energy Effects
Need a simple and easy way to paint your power weapons with buzzing glow energy? Painting techniques will obviously vary by the model, but here’s a general way to achieve the same results.
Here, we will show you how to paint lightning-glow energy on a weapon.
Materials Needed
You can pick any paint scheme you like. For this guide, we will use:
- A Paintbrush
- Mixing bottle
- Palette – Wet
- Primer – Vallejo Surface Primer
- Basecoat color – AK Interactive Tenebrous Gray
- Paint Color
- Contrast medium
- Glaze medium
The Process
- Step 1 – Prime and Apply Basecoat
Always prime your weapon so the paint can stick well on it. If you’re considering making this glowing energy on your Warhammer 40K weapons, always prime in black, especially if you plan to use a dark gray basecoat.
After priming the model’s surface, apply the first base coat color. I generally mix my base coat with 4 part contrast medium and 4-part base coat color. A trick like this will provide exceptional coverage in one or two passes.
- Step 2 – Paint the Power Lightning Effects
Now, on your wet palate, pour some paint to sketch the glowing energy to form a lightning pattern.
Sketching out lightning can take some practice if you’ve not done this before. Don’t worry! This is something you can learn quickly.
Sketch the first layer, creating gradients with the brightest color at the top. Apply two layers so that the color doesn’t appear overwhelming.
- Step 3: Blend the Colors
After sketching the magical lightning, start blending in the colors to get smooth transitions that glow. Make sure that the energy source appears lighter than the bottom part of your weapon. To emphasize the power source, blend in more white paint.
- Step 4: Glaze
Get your glaze color and run it over the weapon to tint the dark part. Do two passes, ensuring that the glaze dries off well before adding another coat.
- Step 5: Highlight the Lighting Effect
Now, it’s time for some magic! Load your small detailed brush with white glaze; make sure the brush has pointed tips. Wick away most of the paint on the brush to help you control the paint, and carefully trace the lightning bolts you sketched to make them glow.
- Step 6: Paint the Glow Outwards
Keep building the glowing energy outwards by mixing the main undertone color with white. So, if you painted the sword in blue energy, mix 4 parts blue and 4 parts white and paint outwards to ensure the light reflects on the model as tints.
- Step 7: Increase Contrast around the Shadow Parts
Gain, apply the dark shade color, and shade parts that aren’t in the light. It helps make where the light stops more visible. For this process, I apply a wash, preferably Drakenhof Nightshade.
Tips for Painting Glow Energy on Swords and Weapons
- Colored paints look good when creating glow energy, but blue is by far the easiest. Red has a solid tone. Hence, a little amount will go a long way.
- Always increase the contrast around parts that weren’t lit to make where the light stops more visible.
- Pay attention to details when painting light reflections on other parts of the model. You don’t want to cover tiny details that make the model stand out.
- The light source, no matter how its size, should be brighter than the light tints.
Conclusion
So, there you have it! A simple way to paint glowing energy on your miniature weapons. Creating glowing and realistic-looking energy from miniature weapons may seem challenging, but with these steps, you will be on your way to making something stunning for your tabletop game. Have fun experimenting!