How to Paint Glow Effects on Miniature Models
Ever wondered how to paint a glow effect on your miniatures? The glow effect is something many mini-painters struggle with.
Whether you are painting glowing plasma for Warhammer miniatures or glowy magic effects for your metal figures, in this miniature painting guide, we explain different approaches to help you create a magical glow in your miniature models.
Introduction to Painting Glow Effects
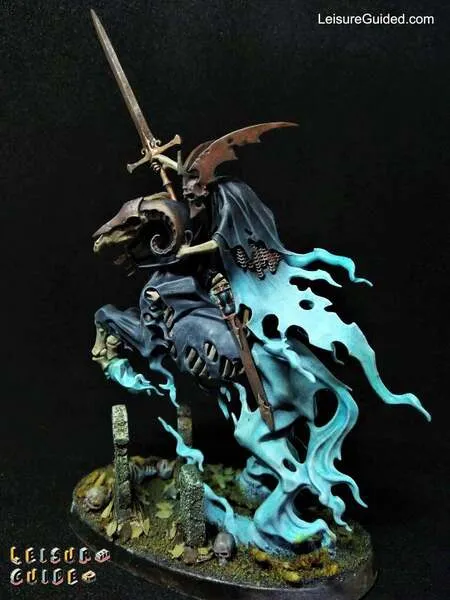
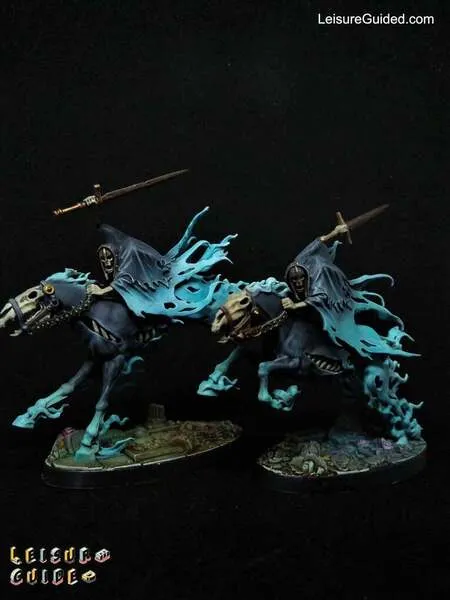
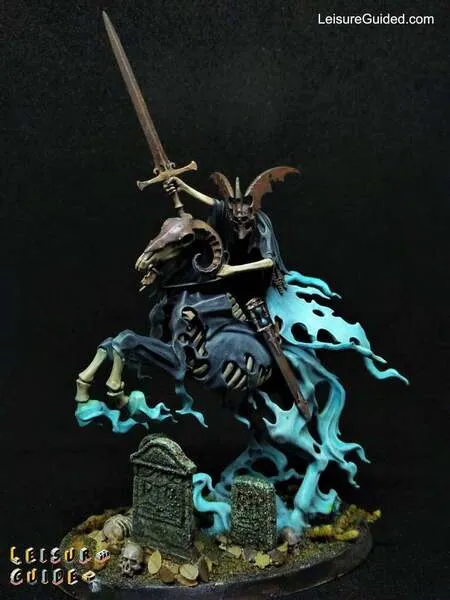
Glow effect, also called Object Source Lighting (OSL), is the art of creating lighting effects on your miniature models so they look like they are glowing.
Glow effect stimulates the illusion of luminous reflections you would typically find on realistic objects like a lamp, torches, magical swords, and guns, making the surrounding area seem light.
When painting glow effects, the key is to remember that it’s a light that makes the surrounding area lighter; it’s not simply changing the color of the paint to glow.
On the other hand, adding glow requires adding contrast. The brightest part of the mini will be your “light source,” and it needs shadows and dark highlights elsewhere to make it pop. Besides this, your object won’t really glow if you’re basing it on white paint.
Hence, when painting light effects, keep in mind that the illusion of that “glow” depends on the dark-to-light contrast.
4 Rules of Painting Glow Effects
Like every other stage in miniature painting, creating glow effects is tricky but will be straightforward and stress-free if you follow four vital rules:
- Paint glow colors only on the desired object
- The lit area should always appear brighter than the surrounding unlit areas
- The glowing part should have similar vibrancy as the light source
- Use a color that matches the object and the light source to achieve the desired glow effect
Most miniature painters often skip rules 1 to 3, but these are really the most important parts people need to consider when painting glow effects on miniatures.
How to Paint Glow with Glazes
Glazing means applying translucent paint over another layer of paint to add saturation, change the undertones or completely alter the color underneath.
For glow effects, glazing helps you add saturation. However, this trick works best if you are glazing over a white basecoat. Of course, every miniature painter knows that blending with white can be a chore. Still, with practice, you can get some amazing results.
So, how do you use glazing to achieve glow effects?
Note: this example will work best if you are working on a flat surface.
Step 1: Create a base for your light source on the edges
In short, create what will be the light source. Painting the glow effect over a flat surface is tricky because you don’t know how where the light source should reflect. To avoid this, paint more white over the area you want to make glow over the base paint so that t blends and transitions smoothly.
Step 2: blend out the edges
Make sure you don’t add the white over the edges, so the glow stays in a straight line. Then, with your brush, blend the white on the edges. This way, it covers well and doesn’t reflect the underlying paint.
Step 3: Glazing
Here, all you need to do is add glazing paint on the edges painted white. However, you may need to add up to three or more layers of your glazing color – i.e., Citadel’s Lamenters Yellow, to reinforce the light source. Then, blend out the edges a bit more.
Other Techniques for Painting Glow Effects
While glazing can give you desired results, popular painting techniques like airbrushing and dry brushing are good techniques that help you create glow effects.
All you need do is thin your paint for airbrush use. Then, use the right nozzle, PSI setting, and distance to get the right glow. For your dry brushing technique, avoid loading excess paint on the dry brush.
Tips for Painting Glow Effects
Here are some good tips to help you make that glow effect work on your miniatures.
- Don’t Use Light Paint Subtly
Translucent colors won’t give you the glow you want. With glow effects, you need to ensure that the color appears vibrant to actually glow. So, if you have problems with light tones, add more layers to make it appear lighter. The same also applies to creating dark shadows.
- Avoid Placing Light Sources Where It Affects Natural Shadows.
No matter how light you paint the glow effect, you won’t achieve the desired result if the mini casts shadows that hide its vivacity. A quick trip to resolve this is to fill in recesses where you want to paint glow effects.
- Always Highlight the Light Sources Backwards
Painting an object with light colors means the surrounding areas with dark tones will appear more like shadows and end up damaging the effect. To avoid this, increase the lightness on the areas with more shadows to enhance the illusion of brightness.
- Always Consider the Material
Light reflects differently on different materials, especially as every material has its own texture. If you’re painting on matte material, make sure the light is spread out. On reflective materials like leather and metals, ensure the light is more concentrated.
- Avoid Using Complementary Colors Together
Technically, complementary colors help Crete strong and balanced contrast, but when making glow effects, you don’t want this. Why? When you use two light and complementary colors, the chances of having the light color falling on the other are high. When this happens, you can’t achieve a good complementary color contrast.
- Let Yellow Be Your First Choice
Yellow glows are often the easiest to pull off. It is the lightest of all primary colors and combines well with other tones. Plus, using yellow makes it easier to follow rules 1 and 2. Besides this, they are often translucent so you can use them with the glazing technique.
The bright color is where shades should appear. The right way to paint a glow effect on this canon is by painting each of the arches, starting with a bright color in the center and darkening it out.
Conclusion
Glow effects done right can make your miniature models stand out. But, for entry-level painters, the chances of having varying level of success is high. The simple way to combat this is to find colors like yellow that make your job easy.
Also, start with small parts like glowing eyes or flames to build your confidence. With these techniques explained here and consistent practice, you can quickly achieve the pro-level skills you’re aiming for.