How to Paint Miniature Glass and Transparent Surfaces
Do you have some minis that came with clear resin magic elements and would like to give them some color but want them to stay pretty transparent?
From elements like crystals to crystal balls and glass vials, painting them with normal miniature paints will cover up their transparent appearance, making them lose the carefully designed magical effect they can add to your models.
If you want to paint miniature glass and transparent surfaces, this article provides you with the right techniques to paint glass and translucent surfaces on miniatures.
Painting Miniature Glass and Transparent Surfaces
Glass and transparent surfaces are often made with clear materials, making them highly translucent.
For this reason, you may feel that painting them will be an easy task, especially as their translucent frame means they only reflect light weakly unlike when you create textures like snow, ice, glow, and water effect on miniatures. But, their translucent property is what makes painting these elements tricky.
Like how real glasses act, miniature glasses, and transparent surfaces don’t only reflect light but also refract it.
However, unlike metals that bounces light even to the point that you have to consider painting primary and secondary light source on the miniature’s surface, glasses refract light internally. What does this mean?
It means that when painting transparent surfaces and glasses, you don’t just focus on painting how the light bounces but on how the light keeps going through the glass object.
Now, creating this effect can be really tricky. But, when you get it right, the result is that the glass or transparent surfaces become as clear as liquid that it feels like you can see the deepest part of the glass. The trick to making this work is to ensure that you don’t fully paint the glasses. You only really want to detail them, not “paint” them like other parts of the mini.
Also, consider the terrain before painting glass or transparent surfaces on miniatures. You don’t want an unrealistic see-through effect, as this might be the case when you neglect the scene of your model.
How Does Painting Miniature Glass and Transparent Surfaces Work?
When painting glass and other transparent surfaces on miniatures, you want to lay down a bit of varnish first to give your paints something to stick to, and you want to use transparent paints like inks, washes, or clear paints (Citadel gemstone paints, Tamiya Clear, or Reaper Clear paints).
Remember, when painting transparent surfaces, you are going to see through or see the back of everything you put down through it, so use paint lightly.
You already know that transparent surfaces on miniatures will have the glare of lighting highlights on the opposite side showcasing the light source. Of course, this typically happens when you are painting objects like crystal balls and gemstones.
Still, the trick to getting a perfect result is rather than highlight towards the source, think about where the light would shine through on the other side and build paint at the front with this in mind.
On the other hand, if you want to tint the glass to make it appear like a piece intended to be a potion or a spell effect, mixing a transparent paint with a matte medium will do the trick. It helps you create transparent paint that is thick enough to stay where you put it without affecting the clear textures. Plus, you can build up layers to make the color as rich as you want without making it too opaque.
Advanced Techniques for Painting Miniature Glass and Transparent Surfaces
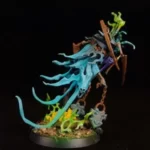
Note: here, we show you how to paint see-through vials, but this technique also works beautifully on other transparent and glass surfaces.
- Basecoat
Apply Vallejo’s Cobalt blue shade as a base coat. Water it down at 2:1 or 3:1 paint to thinner ratio before painting it on your miniatures.
- Wet Blend Paint
Next, use Scale 75 SAP green artist paint and Vallejo’s turquoise blue. Then wet blend them over the basecoat. When mixing these paints, ensure the liquid has a consistent keel to make the paint feel like it is moving inside the vial. Also, paint these colors only from the middle of your vial to the bottom. You want to leave a space at the top for added realism.
If you are painting over non-metallic metal while waiting for the paint to dry, add yellow paint over it and mix it to create a highlight of non-metallic metal.
- Build Highlights to Show Reflection and Refraction
At this point, you don’t have to worry about blending the paint since you will glaze them later. The main aim of this step is to help you build light reflections on your transparent surface. Now, use Vallejo’s light flesh as the highlight.
- Build More Highlight
With your brush, take a light amount of Colbot blue and highlight the turquoise blue and SAP green layer to add differentiation between the see-through glass and the liquid inside.
- Use Stippling to Add Realism
Since we are painting a vial, we want to give the illusion of real air bubbles. So, use a small amount of Vallejo’s turquoise blue paint and add dots randomly to give the illusion of air bubbles in the liquid.
- The Final highlights
For a more realistic effect, use Scale 75 Crimson on the upper part of the vial previously left over to make it seem like you are looking through the vial that is left behind. But make sure to leave a small space close to the middle. Then, paint red and glaze with light flesh.
Also, add a pinch of white paint to highlight the light flesh layer to increase the contrast value. Make sure the Light flesh applied onto the glass vial runs over the red color and down to the turquoise layer so that the reflection travels over the empty space and the area occupied with the liquid.
Conclusion
Painting glasses and transparent surfaces feel more like painting the invisible, but with the right steps, you can create the illusion of clear glass. However, you want to be cautious when applying paint for clear surfaces, as applying too much color to your transparent parts will make the outcomes different from what you expected.